The top part of the Junction main window shows the infrastructure, consisting of tracks, track nodes, and signalling objects. When Junction is first started, or a new document is created, the infrastructure is empty and the window shows only a blank canvas and buttons for each editing tool.
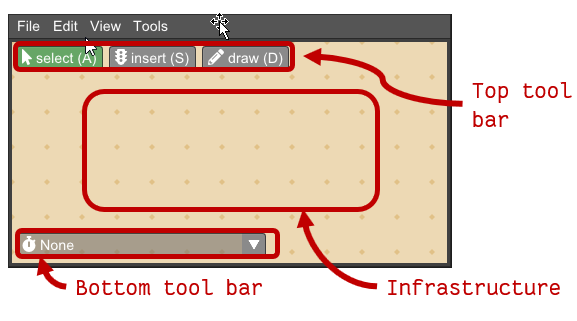
Top tool bar
The top tool bar has the following tools:
-
 Select items (hotkey ‘A’).
Left-click on tracks, nodes, or objects to select them. Currently selected items are highlighted by color. Hold the Shift button to add to selection instead of replacing. Left-click and drag while the pointer is not over any item to draw a selection window. When releasing the mouse button, all items side the selection window will be selected. Left-click and drag while the pointer is over an item to move the item. If the item is part of the current selection, all currently selected items will be moved.
-
 Insert object (hotkey ‘S’).
Insert railway signalling objects. The available objects are:
- Main signal (with or without distant signal)
- Detector (train vacancy detection section boundary)
When inserting a main signal, click on a location beside a track to insert the signal at that side of the track. The side of the track determines the travel direction the signal faces. Trains see signals on the right-hand side of the track.
Detectors are placed in the middle of the track, and constitute a section boundary for a train vacancy detection section.
-
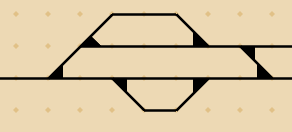
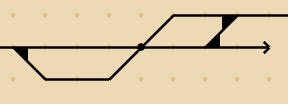
 Draw tracks (hotkey ‘D’).
Left-click and drag to draw lines representing tracks onto the infrastructure grid. Whenever more than two lines meet at a grid point, a node type is detected and a node symbol is displayed. Three lines meeting will produce a switch, and four lines meeting will produce a crossing. Examples:
Bottom tool bar
The bottom tool bar contains the closed version of the dispatch select menu. Click the tool bar to open the dispatch select menu. See Dispatch.
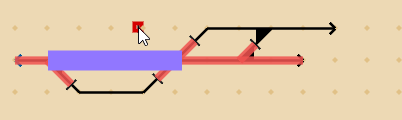
When a dispatch is opened, the current state of the infrastructure at the time selected in the diagram view (see Dispatch) is shown by graphics overlaid on the infrastructure view. These graphics show e.g. train positions and detection section status, but do not affect the use of the infrastructure editor. You may still edit the infrastructure while the dispatch state is shown, and the state will be updated accordingly.
Context menu
The context menu is opened by right-clicking on the infrastructure view. If the pointer is currently over an item, the selection will be set to that item before opening the context menu. The context menu contains actions that are relevant to the currently selected items:
-
Delete, works for all items. When deleting a node, only the changes from the default detected node are deleted, as the number of lines meeting at a grid point will still determine the node type.
-
On nodes and objects, the available properties of that node or object type are displayed in the context menu. For example, crossings may have type (a) crossovers (no switching), (b) single slip (switching in one direction) or (c) double slip (switching in both directions). Main signals may have distant signals enabled or disabled.
-
On boundary nodes and main signals, available train routes are shown. If you click a train route, it is added to the current active dispatch at the current time. If no dispatch is active, a new dispatch will be created and opened, and the selected train route will be added to it. See Dispatch.
-
On all items, adding the item as a visit location in the currently active plan is shown. If no plan is currently active, a new plan is opened, a new train is added to it, and the visit location is added to the train. See Planning.